Automated Builds – Part 10: Using Artifacts
If you read my last article about the builds (here: http://www.mynavblog.com/2020/06/05/automated-builds-part-9-using-azure-vm/) you know that current one will be a continuation. But since the beginning of June, a lot changed in the builds area, so I needed to rethink the scenario.
First, Freddy wrote a series of blog posts about using artifacts when creating a new container. Find all here (really a must read): https://freddysblog.com/2020/06/25/working-with-artifacts/
Second, I get the feedback from the team that we want to have one repository instead of three (app+test+builds). And now, this makes much more sense to me to have only one repository and keep all things in one place since we have workspaces working great in VSCode.
Those two points changed my previous scenario:
- “Still, I want to have separate repositories for Tests and real App” – not valid anymore. Now will have all in one place
- “I want to use as much as possible my build scripts which I created previously” – not valid anymore. Now I need to change them to use artifacts.
Settings.json – some changes
To build using artifacts I do not need anymore in my setting.json file container image. Instead of that, I added a few parameters for the artifacts. It supports all that you need to change quickly the artifact for your build
“ArtifactSettings”: {
“Type”: “Sandbox”,
“Select”: “Latest”,
“Version”: “”,
“Country”: “us”,
“Token”: “”
}
If you want to use insider build you need to specify the current token (to get it you need to be part of Ready To Go program). Also, it is possible to build the exact version of Business Central but if you want to use the latest one you do not need to specify any version (Select – Latest is enough). In the background, it will help to run function Get-BCArtifactUrl from NavContainerHelper (learn more here: https://github.com/microsoft/navcontainerhelper/blob/master/Misc/Get-BCArtifactUrl.ps1).
Since I want to store all in one repository, the next change to the settings.json file is to replace the information about repository with the folder name where the app and test app is stored. I did a small change to ApplicationsToProcess and TestAppsToProcess where there is AppFolder which specifies where the App is stored. Still, you can have multiple applications to be processed in your pipeline but put them in separate folders.
“ApplicationsToProcess”: [
{
“ApplicationId”: “App1”,
“AppFolder”: “App”
}
],
“TestAppsToProcess”: [
{
“ApplicationId”: “TestApp1”,
“AppFolder”: “TestApp”
}
]
YAML for the build
In the previous article, I already had one YAML file which was responsible to start and stop Virtual Machine. Now I need to add to it some parameters and reference to different YAML file which will store all steps to build the app.
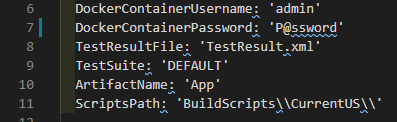
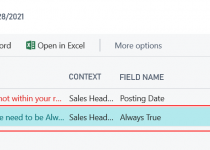
The first two parameters (user and password) are needed to create a container and later compile the apps. The TestSuite and TestResultsFile are needed to run and export the test results to Azure DevOps. The ArtifactName parameter specifies the artifact folder where *.app files will be exported and shown in Azure DevOps.
The last parameter – ScriptsPath, says where the build scripts are stored. To get the different build settings (for example you would like to have the builds for different countries or different versions) you need simply copy the whole folder with the build scripts and change two things:
- settings.json – which says what to built
- BuildTemplate.yml – which says where are the scripts stored (only parameter ScriptsPath need to be changed)
Next point is to add steps that build the container and apps in it. I could do it in the same the YAML file, but it is easier to do it in a separate file and just add the job in BuildTemplate.yml. First, I need to create a new file BuildApp.yml.
In the file BuildTemplate.yml, it is needed to add a step between the start and stop VM. This step will be executed by a different agent than the start and stop VM – it must be installed on VM (please check the previous post to see how to do it). In the step, I will pass all the needed parameters.
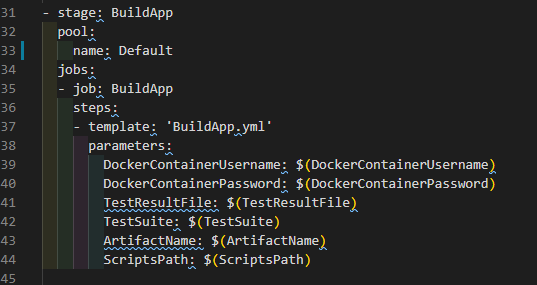
In the BuildApp.yml file, I will put all steps needed to create, publish, and test the app. Steps will be the same as in my previous examples so you can check other posts in the series.
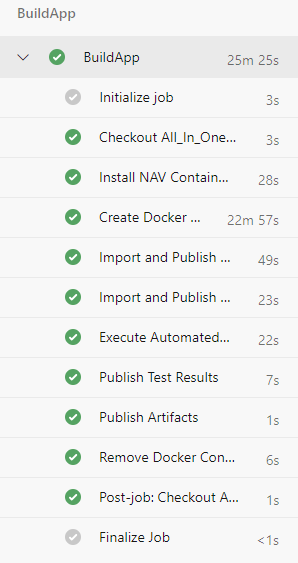
The result – three stages
The result is that in the pipeline there are 3 stages:
- Start VM
- Build App
- Stop VM
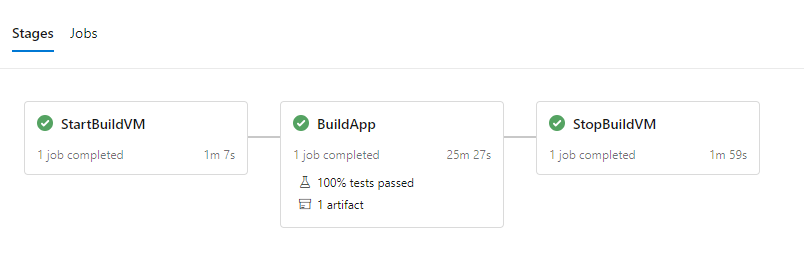
In the Build App stage, a new container is created, Application and Test Application is compiled and published. Next, the tests are executed and published in Azure DevOps. In the end, the container is removed.
Scripts on GitHub
The same as previously all the scripts which I used you can find on GitHub: https://github.com/mynavblog/AzureBuildPipeline/tree/master/V16%20Azure%20VM%20artifacts
Let me know if it is useful for you.

Automated Builds – Part 1: Introduction
What can you find in Setups?