Git workflow – new for us not so new for others
For us, Dynamics NAV/Business Central people, Git is something which we never used before – of course with some exceptions. However for version control and storing the objects we had either some customized solution directly in NAV or we used Development Environment.
I was really impressed of Kamil Sacek’s presentation on Direction EMEA last year about Git Branching Strategy. And because I was saying about it in my company (maybe even too loudly) some time ago my manager asked me to consume this knowledge for one of our product. And since he agreed I would like to share with you how I solved the problem called:
We will have new release of our product – how would you set Git branches for that?
Some notes before I will start
First of all I must say: there are multiple ways to solve this. Second: The solution below works for us but, that doesn’t mean it will work for you – all depends onsituation and complexity which you would like to have.
Basics of Version Control and Git
For whom which are not familiar what is for example Repository, Branch, Pull, Push etc. I really strongly advise to check tutorial on this page https://www.atlassian.com/git/tutorials and go thru basics. Those terms are really needed!
Scenario
To understand the branching strategy presented in the next points I owe you some explanation first. We release the product (hurray!!!) which is already installed in the customers’ databases and now we working on next release of the product (even more hurray!!!).
Means we do not want to have yet in the product the modifications which are still not tested and approved. So any new customer still would got the product in the version which is now treated as final.
That’s also mean we cannot merge our objects to the main branch until all will agree that we have new extension version but we still need to be able to do the fixes if something was wrong and propagate them to existing customers.
The Strategy
First let’s have a look on a diagram and below you will find detailed description of each of branches which we need.
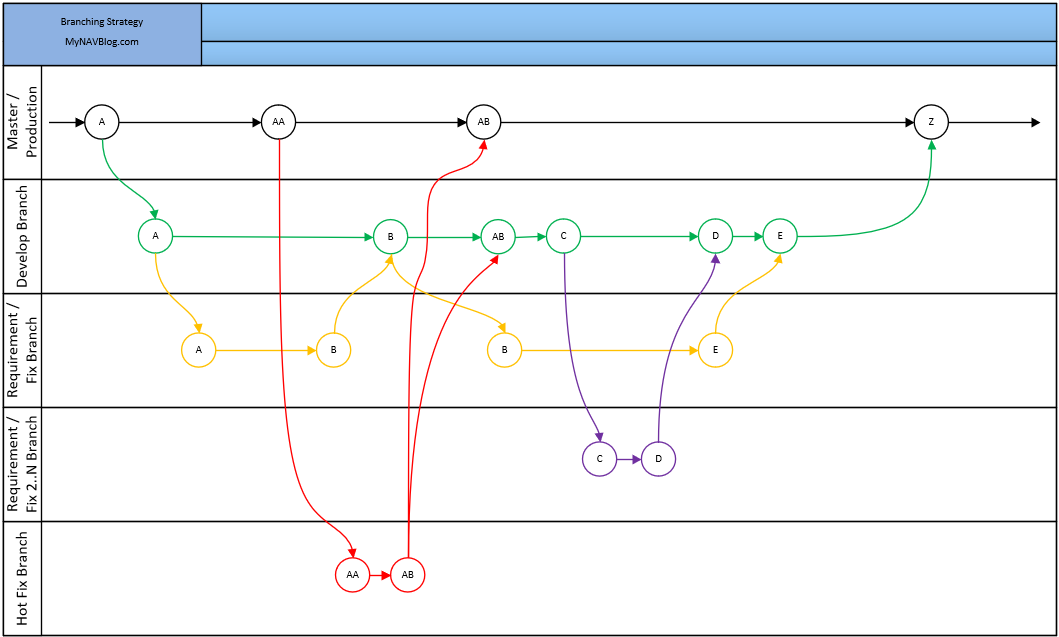
Master branch – This is what customer gets
The master branch is used as a production branch. Code from this branch is taken as a base for installation of the extension to the customer’s database. It is good to setup it this way that only authorized people for example Product Owners can merge code to this branch. Then they will decide when new release is done.
There are two cases when the code should be merged to the master branch. First one is when the new release is done and customers should be updated with the new version of the application (Point Z on the diagram).
Second is when there is a need to prepare hot fix which is discovered by customers or testers (Point AA on the diagram) and should be installed as soon as possible in the customers’ databases (Point AB on the diagram).
From the master branch, when there is decision to start working on new release, should be created the develop branch (Point A on the diagram).
Develop branch – Do not show it to anyone. That will be a surprise!
The develop branch is used as a branch where all finished modifications (requirements) are stored – other words this is what will be in new release ready for deployment to the master branch. From this branch the testing environment is prepared. Also it is good but not mandatory (up to you) who should be able to merge code to this branch. I prefer to have at least one code reviewer.
This branch should be taken by developers as a parent branch for all new modifications which should be prepared (Point A or C on the diagram). After the changes (requirement) are done then the code should be merged to the develop branch (Point B, D or E on the diagram).
Small hint: to create a branch from the master using Git you can use the below commands – you will end up with to exactly the same branches master and develop
git branch develop
git push -u origin develop
Requirement branch – this is where Developers do the magic
If it is needed to prepare new functionality, developer should create a new branch from the develop branch (Point A or C on the diagram) – not from the master branch. The requirement branch is used only by a developer. After the code will be approved and merged to the develop branch (Point B, D or E on the diagram) the requirement branch should be deleted from the repository because it is no longer needed.
Very important is that developer is fully responsible to have all objects up to date in this branch. Means she or he need to avoid conflicts when merging it back to the develop branch.
Hot fix branch – this is where Developers do the magic to the previous magic
Ok if we have something to be fixed really quickly we need this kind of branches. If the hot fix needs to be installed to the customers’ database then developer should create a new branch from the master branch (Point AA on the diagram) (not from developer branch!).
The hot fix branch, unlikely to the requirements branches, need to be merged to two branches. First to master branch, that it will be possible to prepare new application for the customers, and then to the develop branch (Point AB on the diagram). In both branches it should be tested to check if the bug had been fixed.
Gitflow
If you like the idea of branching policy presented above and want to know more then here is link which helped me preparing this: https://www.atlassian.com/git/tutorials/comparing-workflows/gitflow-workflow

BC TechDays 2022 – event that you should not miss

AppSource has more than 1000 apps. What do I think about it?

Happy that at least one attendee have income from my session… 😎
Nice and clean picture of the flow, thanks!
The bit I find tricky is how you merge your hotfix AB into your develop branch, when it is based on master. When I try to ask git to do this it says “No” (with a lot more words than that).